

Shop Now
-
ACRYLIC PAINTS & MEDIUMS
- Specials
- New Arrivals
- Featured
- Clearance
- ART SPECTRUM ACRYLIC MEDIUMS
- ART SPECTRUM COLOURFIX PRIMER
- AUREUO ACRYLIC PAINT SETS
- CHROMACRYL MEDIUMS
- CHROMACRYL STUDENT ACRYLIC
- DERIVAN MEDIUMS
- DERIVAN STUDENT ACRYLIC PAINT
- EXPRESSION PAINTING SETS
- FLASHE
- FLUID WRITER PENS
- GOLDEN FLUID ACRYLIC
- GOLDEN HEAVY BODY ACRYLIC
- GOLDEN HIGH FLOW ACRYLIC
- GOLDEN MEDIUMS & VARNISHES
- GOLDEN OPEN ACRYLIC
- GOLDEN SOFLAT MATTE ACRYLIC
- MATISSE BACKGROUND
- MATISSE MEDIUMS
- MATISSE STRUCTURE
- NAM VARNISHES
- PEBEO ACRYLIC MEDIUMS
- PEBEO STUDIO ACRYLIC
- SCHMINCKE ACRYLIC MEDIUMS
- SCHMINCKE AEROCOLOR ACRYLIC
- SCHMINCKE AKADEMIE ACRYLIC
- WINSOR & NEWTON ACRYLIC MEDIUMS
- WINSOR & NEWTON ARTISTS ACRYLIC
- AIRBRUSHES
- ART ACCESSORIES
- ART BAGS, PORTFOLIOS & PRESENTATION
- BOARD & CARD
-
BOOKS
- New Arrivals
- BOOKS ACRYLIC PAINTING
- BOOKS ARCHITECTURE
- BOOKS ART AND CRAFT KITS
- BOOKS CHARACTER DESIGN
- BOOKS COLOUR THEORY
- BOOKS COLOURING BOOKS
- BOOKS CREATIVE KIDS
- BOOKS DRAWING
- BOOKS FASHION & TEXTILES
- BOOKS FIGURE DRAWING
- BOOKS FLORA AND FAUNA
- BOOKS GRAPHIC DESIGN
- BOOKS HAND LETTERING
- BOOKS ILLUSTRATION
- BOOKS KAWAII
- BOOKS LOGO DESIGN
- BOOKS MANGA
- BOOKS MIXED MEDIA
- BOOKS MONOGRAPHS
- BOOKS MOTIVATIONAL
- BOOKS NZ AOTEAROA ART
- BOOKS OIL PAINTING
- BOOKS PACKAGING DESIGN
- BOOKS PAPER ARTS & ORIGAMI
- BOOKS PHOTO TECHNIQUES
- BOOKS PHOTOGRAPHY
- BOOKS PRINTMAKING
- BOOKS PRODUCT DESIGN
- BOOKS PUZZLES AND GAMES
- BOOKS SCULPTURE AND CLAY
- BOOKS STREET ART
- BOOKS TYPOGRAPHY
- BOOKS URBAN SKETCHING
- BOOKS WATERCOLOUR PAINTING
-
BRUSHES & PALETTE KNIVES
- Specials
- New Arrivals
- Clearance
- BAMBOO BRUSHES
- BRUSH SOAP & CLEANERS
- BRUSH STANDS & STORAGE
- COLOUR SHAPERS
- DA VINCI BLACK SABLE BRUSHES
- DA VINCI BRISTLE BRUSHES
- DA VINCI BRUSH SETS
-
DA VINCI CASANEO WATERCOLOUR BRUSH
- DA VINCI CASANEO FLAT BRUSH
- DA VINCI CASANEO LINER BRUSH
- DA VINCI CASANEO MINI BRUSHES
- DA VINCI CASANEO MOTTLER
- DA VINCI CASANEO OVAL BRUSH
- DA VINCI CASANEO POCKET TRAVEL BRUSH
- DA VINCI CASANEO RIGGER BRUSH
- DA VINCI CASANEO ROUND BRUSH
- DA VINCI CASANEO SHORT STROKE BRUSH
- DA VINCI CASANEO SLANT EDGE BRUSH
- DA VINCI CASANEO WASH BRUSH
- DA VINCI CHUNEO SYNTHETIC BRISTLE BRUSHES
- DA VINCI COLINEO OIL & ACRYLIC LONG HANDLED BRUSHES
- DA VINCI COLINEO WATERCOLOUR BRUSHES
- DA VINCI COSMOTOP MIX BRUSHES
- DA VINCI COSMOTOP NOVA BRUSHES
- DA VINCI COSMOTOP SPIN BRUSHES
- DA VINCI COSMOTOP WASH BRUSHES
- DA VINCI DRY BRUSHES SYNTHETIC
- DA VINCI FORTE BRUSHES
- DA VINCI IMPASTO BRUSHES
- DA VINCI JUNIOR SYNTHETIC BRUSHES
-
DA VINCI KOLINSKY RED SABLE BRUSHES
- DA VINCI ARTIST COLLECTION GRIS BRUSH
- DA VINCI KOLINSKY SABLE WATERCOLOUR BRUSH SERIES 36
- DA VINCI LETTERING BRUSH POINT
- DA VINCI MAESTRO KOLINSKY SABLE WATERCOLOUR BRUSH SERIES 11
- DA VINCI MAESTRO KOLINSKY SABLE WATERCOLOUR BRUSH SERIES 35
- DA VINCI MAESTRO MINIATURE BRUSHES
- DA VINCI RED SABLE POCKET TRAVEL BRUSH
- DA VINCI LETTERING BRUSHES
- DA VINCI MAESTRO2 BRISTLE BRUSHES
- DA VINCI MICRO BRUSHES
- DA VINCI SPECIAL BRUSHES
- DA VINCI SQUIRREL/WASH BRUSHES
-
DA VINCI STUDENT BRUSHES
- DA VINCI COLLEGE BRUSH FILBERT
- DA VINCI COLLEGE BRUSH FLAT
- DA VINCI COLLEGE BRUSH ROUND
- DA VINCI FIT HOBBY BRUSH FILBERT
- DA VINCI FIT HOBBY BRUSH FLAT
- DA VINCI FIT HOBBY BRUSH ROUND
- DA VINCI FIT HOBBY SYNTHETIC MOTTLER BRUSH
- DA VINCI FIT SYNTHETIC BRISTLE BRUSH FLAT
- DA VINCI STUDENT BRISTLE FLAT
- DA VINCI STUDENT BRISTLE ROUND
- DA VINCI TOP-ACRYL BRUSHES
- ESSDEE SPONGE ROLLERS
- EXPRESSION BRUSHES
- JASART HOG BRISTLE BRUSHES
- JASART MOP & STENCIL BRUSHES
- PALETTE KNIVES
- PEBEO BRUSH SETS
- PEBEO IRIS BRUSHES
- PEBEO MOTTLER BRUSHES
- WINSOR & NEWTON COTMAN WATERCOLOUR BRUSHES
- WINSOR & NEWTON GALERIA BRUSHES
- WINSOR & NEWTON SCEPTRE GOLD BRUSHES
- WINSOR & NEWTON SERIES 7 BRUSHES
- WINSOR & NEWTON WINTON BRUSHES
-
CANVAS & PANELS
- Specials
- New Arrivals
- Clearance
- CANVAS ROLLS
- CANVAS STRETCHING TOOLS
- CEDAR STRETCHER BARS
- EXPRESSION CANVAS PANELS
- EXPRESSION CRADLED GESSO BOARDS
- EXPRESSION STRETCHED CANVAS
- FREDRIX STRETCHED CANVAS, PANELS, PADS
- MUSEO LINEN CANVAS
- MUSEUM STRETCHED CANVAS
- NAM NATURAL LINEN CANVAS
- NAM ROUND CANVAS PANELS
- PINE STRETCHER BARS & BRACES
- PRO-PANELS
- SKATEBOARD DECK ART BOARD
- STRETCHED WITH LOVE CANVAS
- CERAMIC PAINT
- DRAWING BOARDS,STANDS & TABLES
- EASELS
- ENCAUSTIC PAINTS & MEDIUMS
- ENVELOPES
- FABRIC PAINT & DYES
- FACE & BODY PAINT
- FOAMBOARD
- GIFT CARDS
- GLASS PAINT
- GOUACHE PAINTS
-
INKS
- Specials
- New Arrivals
- Clearance
- CRETACOLOR CALLIGRAPHY INK
- DANIEL SMITH WALNUT INK
- DERIVAN INKS
- FIVE STAR INDIAN INK
- JACQUARD PINATA ALCOHOL INK
- MAGIC COLOUR
- MONTEVERDE FOUNTAIN PEN INKS
- PEBEO COLOREX INK
- PEBEO INDIAN INK
- ROTRING INKS
- SCHMINCKE 1912 INDIAN INK
- STAEDTLER INKS
- STAEDTLER MARS MATIC TECH PENS
- WINSOR & NEWTON INKS
- ZIG KURETAKE INK
- KNIVES & CUTTING TOOLS
- LIGHT PADS, LIGHTBOXES & LIGHTING
-
MARKERS & PENS
- Specials
- New Arrivals
- Featured
- Clearance
- ARTLINE PENS
- CALLIGRAPHY PENS & NIBS
- COPIC CIAO MARKERS
- COPIC CLASSIC MARKERS
- COPIC GASENFUDE BRUSH PENS
- COPIC MULTI LINERS
- COPIC REFILL INKS
- COPIC SKETCH MARKERS
- CORRECTION TAPES & PENS
- FABER CASTELL ALBRECHT DURER WATERCOLOUR MARKERS
- FABER CASTELL GRIP PLUS BALL PENS
- FABER CASTELL PITT ARTIST PENS
- FABER PITT ARTIST DUAL MARKER
- ICON PENS
- INDIGRAPH FOUNTAIN PENS
- LAMY PENS
- MARKER WALLETS & STORAGE
- MOLOTOW BLACKLINER PIGMENT LINER PENS
- MOLOTOW BURNER MARKERS
- MOLOTOW CHALK MARKERS - REFILLABLE
- MOLOTOW DRIPSTICKS
- MOLOTOW EXCHANGE TIPS
- MOLOTOW GRAFX MASKING LIQUID
- MOLOTOW LIQUID CHROME MARKERS
- MOLOTOW MASTERPIECE PAINT MARKERS
- MOLOTOW ONE4ALL PAINT MARKERS
- MOLOTOW SKETCHER MARKERS
- MONTEVERDE PENS
- PEBEO 4ARTIST OIL BASED PAINT MARKERS
- PEBEO COLOREX WATERCOLOUR INK MARKERS
- PENTEL PENS
- PILOT MR SERIES PENS
- PILOT PENS
- POSCA MARKERS
- ROTRING PENS
- SCHMINCKE AERO LINER EMPTY MARKERS
- SCHNEIDER
- SHARPIE
- STABILO FINELINER PENS
- STAEDTLER COLOUR FIBRE TIP PEN
- STAEDTLER DESIGN JOURNEY MARKER SETS
- STAEDTLER LUMOCOLOR MARKERS
- STAEDTLER MARS MATIC TECH PENS
- STAEDTLER PIGMENT ARTS PEN
- STAEDTLER PIGMENT LINER
- STAEDTLER PREMIUM PENS
- STAEDTLER TEXTSURFER HIGHLIGHTERS
- STAEDTLER TRIPLUS FINELINERS
- STAEDTLER WRITING PENS
- TEXTA LIQUID CHALK MARKERS
- TOMBOW ABT PRO ALCOHOL BASED MARKERS
- TOMBOW DUAL BRUSH PENS
- TOMBOW FUDENOSUKE PENS
- U-KNOCK XQ GEL PEN
- UNI PENS & MARKERS
- WINSOR & NEWTON BRUSH MARKERS
- WINSOR & NEWTON PROMARKERS
- ZIG PENS
-
MODELLING , SCULPTING, CLAY & RESIN
- Specials
- New Arrivals
- Clearance
- 3D PRINTING FILAMENT
- ART EMBOSS FOIL
- BALSA & BASSWOOD
- CHAVANT MODELLING CLAY
- CLAY SHAPERS
- CLAYTOON NON-HARDENING MODELLING CLAY
- DAS MODELLING CLAY
- ESSDEE ALUMINIUM ROLLERS
- EXCEL MODELLING TOOLS
- EXPRESSION MODELLING TOOLS
- FIMO
- FIMO EFFECT
- FIMO KIDS
- FIMO LEATHER-EFFECT
- FIMO PROFESSIONAL
- FIMO TOOLS & ACCESSORIES
- GEDEO CLAY, RESIN & MOULDING
- HOT WIRE FOAM TOOLS
- JOVI AIR HARDENING CLAY
- K&S METALS
- KIWI UNDERGLAZE
- MACS MUD CLAYS
- MDF BOARD & PLYWOOD PANELS
- MILLIPUT EPOXY PUTTY
- MISCELLANEOUS MODELLING TOOLS
- MODELLING COMPOUNDS & PLASTER
- MODELLING WIRE
- NEWPLAST ANIMATION CLAY
- NORSKI RESINS & ACCESSORIES
- PAL TIYA
- PEBEO FLUID PIGMENTS FOR RESINS
- PLASTALINA NON-HARDENING MODELLING CLAY
- PLASTIC SHEET PRODUCTS
- PROTOLINA NON-HARDENING MODELLING CLAY
- RGM SCULPTING TOOLS
- SCULPEY CLAYS
- SCULPEY LIQUID BAKEABLE CLAY
- SCULPEY PREMO CLAY
- SCULPEY SOUFFLE CLAY
- SCULPEY TOOLS & ACCESSORIES
- WIREFORM
- WOODEN SHEETS & STICKS
-
OIL PAINTS & MEDIUMS
- Specials
- New Arrivals
- Clearance
- ART SPECTRUM ARTIST OILS
- ART SPECTRUM OIL MEDIUMS
- CHROMA ARCHIVAL OIL MEDIUMS
- FIVE STAR OIL MEDIUMS
- GAMBLIN MEDIUMS
- MAIMERI CLASSICO OIL
- MICHAEL HARDING OILS
- OLD HOLLAND OIL COLOURS
- PEBEO OIL MEDIUMS
- PEBEO XL OIL
- R&F PIGMENT OIL PAINT STICKS
- SCHMINCKE ARTIST OIL FLAKE WHITE
- SCHMINCKE MUSSINI OIL
- SCHMINCKE NORMA BLUE WATER-MIXABLE OIL
- SCHMINCKE NORMA PROFESSIONAL OIL
- SCHMINCKE OIL MEDIUMS
- SHELLAC
- TMK SOLVENTS & SPIRITS
- WILLIAMSBURG OIL
- WINSOR & NEWTON ARTISAN WATER MIXABLE OILS
- WINSOR & NEWTON ARTISTS OILS
- WINSOR & NEWTON GRIFFIN ALKYD FAST DRYING OIL COLOUR
- WINSOR & NEWTON OIL MEDIUMS
- WINSOR & NEWTON WINTON OILS
- PACKAGING PRODUCTS
-
PADS, BLOCKS & PACKS
- Specials
- New Arrivals
- Clearance
- ARCHES PADS & BLOCKS
- AWAGAMI WASHI PACKS
- BOCKINGFORD PADS
- CANSON PADS & BLOCKS
- CLAIREFONTAINE PASTELMAT PADS
- COLOURFIX PADS & PACKS
- FABRIANO PADS, PACKS & BLOCKS
- GORDON HARRIS PADS
- GRAPH PAPER PADS & SHEETS
- HAHNEMUHLE PADS, PACKS AND BLOCKS
- LANA FINE ART PAPER PADS
- MAGNANI BLOCKS & PADS
- MOLOTOW MARKER PADS
- WARWICK EXERCISE BOOKS & PADS
- WINSOR & NEWTON MARKER PADS
- X-PRESS IT BLENDING PADS
- PANTONE GUIDES
- PAPER & CARD COLOURED
- PAPER ACCESSORIES
-
PAPER FINE ART
- Specials
- New Arrivals
- Clearance
- ARCHES FINE ART PAPERS
- AWAGAMI FINE ART PAPERS
- CANSON MI-TEINTES PAPER
- CANSON WATERCOLOUR PAPERS
- CARTRIDGE PAPER
- COLOURFIX PAPER
- CRESCENT RENDR PAPER ROLLS
- EXPRESSION RENDERING PAPER
- FABRIANO FINE ART PAPERS
- GLASSINE PAPER
- HAHNEMUHLE FINE ART PAPER - ROLLS
- HAHNEMUHLE FINE ART PAPER - SHEETS
- KHADI PRINTMAKING PAPER
- LANA FINE ART PAPERS
- MAGNANI FINE ART PAPERS
- NEWSPRINT PAPER
- SCHOOL ART PAPER & CARD
- YUPO SYNTHETIC PAPER
-
PASTELS & PASTEL PENCILS
- Specials
- New Arrivals
- CARAN D'ACHE NEOPASTEL
- CRETACOLOR PASTEL STICKS
- DERWENT PASTEL PENCIL SETS
- FABER CASTELL PITT PASTEL PENCILS
- FABER CASTELL POLYCHROMOS PASTELS
- HARD & SOFT PASTELS
- MUNGYO OIL PASTELS
- MUNGYO SEMI-HARD PASTELS
- MUNGYO SOFT PASTELS
- NAM VARNISHES
- OIL PASTELS
- PAN PASTELS
- PASTEL FIXATIVES & GROUNDS
- SCHMINCKE PASTELS
- STAEDTLER DESIGN JOURNEY PASTEL & CRAYON SETS
-
PENCILS, CRAYONS, CHARCOAL & ACCESSORIES
- Specials
- New Arrivals
- Featured
- Clearance
- ART GRAF GRAPHITE & CARBON
- BLACKWING
- CARAN D'ACHE LUMINANCE SETS
- CARAN D'ACHE NEOCOLOR I
- CARAN D'ACHE PABLO
- CARAN D'ACHE SUPRACOLOUR
- CHALK & ACCESSORIES
- CLUTCH PENCILS, LEAD HOLDERS & LEADS
- COATES WILLOW CHARCOAL
- CONTE CRAYONS
- CRETACOLOR ARTISTS' COLOUR PENCILS
- CRETACOLOR CHARCOAL & GRAPHITE
- CRETACOLOR DRAWING & COLOUR PENCIL SETS
- Caran D'Ache NEOCOLOR CRAYONS
- DERWENT INKTENSE SINGLE PENCIL
- DERWENT SETS
- DRAWING ACCESSORIES
- ERASERS
- EXPRESSION PAPER STUMPS
- EXPRESSION WILLOW CHARCOAL STICKS
- FABER CASTELL 9000 PENCILS
- FABER CASTELL ALBRECHT DURER WATERCOLOUR PENCILS
- FABER CASTELL ARTISTS PENCILS
- FABER CASTELL GOLDFABER 1221 PENCILS
- FABER CASTELL GOLDFABER 1221 PENCILS
- FABER CASTELL PITT CHARCOAL & GRAPHITE
- FABER CASTELL PITT PASTEL STICKS
- FABER CASTELL POLYCHROMOS ARTISTS COLOUR PENCILS
- FABER CASTELL RED RANGE CLASSIC PENCIL SETS
- FABER CASTELL UNIVERSAL MARKING PENCILS
- FABER MIX & MATCH CRAYONS
- HONEYSTICKS BEESWAX CRAYONS
- JOLLY X-BIG SUPERSTICK PENCILS
- MECHANICAL PENCILS
- MOLESKINE PENCILS
- MUNGYO WATERCOLOUR CRAYONS
- PENCIL CASES & WRAPS
- PRISMACOLOR PENCILS
- SHARPENERS
- STAEDTLER COLOUR PENCIL SETS
- STAEDTLER CRAYON & PASTEL SETS
- STAEDTLER DESIGN JOURNEY COLOUR PENCIL SETS
- STAEDTLER LUMOCOLOR PENCILS
- STAEDTLER LUNA PENCILS
- STAEDTLER MARS LEADS
- STAEDTLER MARS LUMOGRAPH PENCILS
- STAEDTLER NORIS,NORICA PENCILS
- STAEDTLER TRADITION PENCILS
- TOMBOW MONO GRAPHITE PENCILS
- WOLFF CARBON PENCILS
- PIGMENTS & MEDIUMS
- PRINTER PAPERS, FILMS & LABELS
-
PRINTMAKING
- Specials
- New Arrivals
- Clearance
- BLOCK PRINTING KITS
- CHARBONNEL ETCHING GROUNDS
- ESSDEE SCRAPERBOARD
- FLOX & TUFFERY PACKS
- GELLI PRINTING PLATES
- JACQUARD CYANOTYPE
- JACQUARD SOLARFAST
- PRINTING PLATES, BLOCKS & LINO
- PRINTING PRESSES
-
PRINTMAKING INKS
- AKUA INTAGLIO INK
- AKUA INTAGLIO MEDIUMS
- CHARBONNEL ETCHING INKS
- CHARBONNEL WATER WASHABLE INK
- CHARBONNEL WATER WASHABLE MEDIUMS
- CRANFIELD CALIGO SAFE WASH ETCHING INKS
- CRANFIELD CALIGO SAFE WASH RELIEF INK
- CRANFIELD PRINTMAKING MEDIUMS
- CRANFIELD TRADITIONAL ETCHING INKS
- CRANFIELD TRADITIONAL RELIEF INKS
- ESSDEE FABRIC PRINTING INKS
- ESSDEE WATERBASED BLOCK PRINTING INKS
- FIVE STAR PRINTING INK
- FLINT OIL BASED PRINTING INK
- FLINT WATER BASED PRINTING INK
- SCHMINCKE AQUA LINOPRINT INKS
- SCHMINCKE AQUA LINOPRINT MEDIUMS
- SCHMINCKE LINOPRINT SETS
- SPEEDBALL FABRIC RELIEF INKS
- SPEEDBALL PROFESSIONAL RELIEF INKS
- SPEEDBALL WATERBASED RELIEF INKS
-
PRINTMAKING ROLLERS, CUTTERS & TOOLS
- BARENS
- BENCH HOOKS
- ESSDEE COLD WAX ROLLERS
- ESSDEE FABRIC INK ROLLERS
- ESSDEE HARD RUBBER INK ROLLERS
- ESSDEE PROFESSIONAL INK ROLLERS
- ESSDEE SOFT RUBBER INK ROLLERS
- ETCHING NEEDLES
- EXPRESSION STANDARD RUBBER INK ROLLERS
- HWAHONG ROLLERS & TOOLS
- LINO & WOOD CUTTERS & CARVING TOOLS
- SPEEDBALL LINO ROLLERS
- PRINTMAKING STENCILS
- PROJECTORS
- SCHOOL & UNIVERSITY KITS
- SCREENPRINTING
-
SKETCH BOOKS, NOTEBOOKS, VISUAL DIARIES
- Specials
- New Arrivals
- Featured
- Clearance
- CRESCENT RENDR SKETCHBOOKS
- FABRIANO ECOQUA NOTEBOOKS
- FABRIANO ISPIRA NOTEBOOKS
- FABRIANO SKETCH & WATERCOLOUR BOOKS
- FLEXBOOK SKETCHBOOKS & NOTEBOOKS
- GORDON HARRIS VISUAL DIARIES
-
HAHNEMUHLE SKETCH BOOKS
- HAHNEMUHLE CAPPUCINO BOOK
- HAHNEMUHLE NOSTALGIE SKETCH BOOK
- HAHNEMUHLE SKETCH BOOK D&S
- HAHNEMUHLE SKETCH BOOK HARDCOVER
- HAHNEMUHLE SKETCH BOOKLETS
- HAHNEMUHLE SPIRAL BOUND SKETCH BOOKS
- HAHNEMUHLE THE GREY BOOK
- HAHNEMUHLE TONED WATERCOLOUR BOOKS
- HAHNEMUHLE TRAVEL JOURNALS
- HAHNEMUHLE WATERCOLOUR BOOKS
- HAHNEMUHLE ZIG ZAG BOOK
- LEUCHTTURM 1917 NOTEBOOKS
- MOLESKINE NOTEBOOKS
- MOLOTOW MARKER SKETCHBOOK
- PAPERBLANKS NOTEBOOKS
- SPECIALTY PAINTS & FINISHES
- SPRAY PAINT
- STATIONERY
-
TAPES, GLUES & ADHESIVES
- Specials
- New Arrivals
- Clearance
- ADHESIVE PUTTIES & CEMENTS
- ARTOGRAPH SPRAY BOOTHS
- CELLULOSE & INVISIBLE TAPES
- DOUBLE SIDED TAPES & SHEETS
- GLUE GUNS & STICKS
- GLUE STICKS & ROLLERS
- HOLDFAST HOOK & LOOP
- MASKING TAPES & FILMS
- PACKAGING TAPE
- PAPER & CLOTH TAPES
- PVA & WOOD GLUES
- SELF ADHESIVE SHEETS & ROLLS
- SPECIALITY & ALL PURPOSE GLUES
- SPRAY ADHESIVES
- XYRON PROFESSIONAL
- TECHNICAL DRAWING PRODUCTS
- TRACING PAPER & DRAFTING FILM
-
WATERCOLOUR PAINTS & MEDIUMS
- Specials
- New Arrivals
- Featured
- Clearance
- DANIEL SMITH WATERCOLOUR
- PEBEO WATERCOLOUR MEDIUMS
- PEBEO WATERCOLOUR PAINT SETS
- QOR MODERN WATERCOLOURS
- SCHMINCKE AKADEMIE WATERCOLOUR
- SCHMINCKE AQUA DROP
- SCHMINCKE HORADAM WATERCOLOUR
- SCHMINCKE LIQUID CHARCOAL
- SCHMINCKE WATERCOLOUR MEDIUMS
- WATERBRUSH PENS
- WATERCOLOUR STUDENT PAINT SETS
- WINSOR & NEWTON COTMAN WATERCOLOURS
- WINSOR & NEWTON PROFESSIONAL WATERCOLOUR
- WINSOR & NEWTON WATERCOLOUR MARKERS
- WINSOR & NEWTON WATERCOLOUR MEDIUMS
Artists’ Paint:A Closer Look At Quality
Artists’ Paint: a closer look at quality
Paint quality varies, depending on who the intended user is. We make sure that even our most affordable paint is the best quality that price will allow. For passionate recreational painters and discerning professionals, however, there are many qualities besides price our colours must satisfy – the colour must sing! It must perform flawlessly, feel gorgeous, seduce the viewer, last for decades… in short – it must reflect perfectly what we have in our mind’s eye.


Genuine Cobalt Blue (in the pictures on the left) creates a wide range of strong greens when mixed, while the substitute Cobalt Blue (in the pictures on the right) Hue mixes weakly and without a broad spectrum of tones.
Paint is made from pigment and binder. Pigment is the colour component, and comes from many sources: earth minerals, metals, and various chemical combinations. Some pigments are plentiful, such as those made from iron or copper, so are inexpensive. Rare pigments, like cobalt, are expensive due to their scarcity or difficultly to manufacture.
Student colour is made for a low price point so only uses inexpensive pigments. Where an expensive pigment is called for, for instance Cobalt Blue, student colour will approximate the original by mixing cheaper pigments together; this is usually called a “hue”. Substituting pigments creates problems for mixing, where too many pigments in the mix creates muddy colour. In the image above, genuine Cobalt Blue mixes cleanly with yellow to produce strong green shades; while the student quality Cobalt Blue Hue, mixed with the same yellow pigment, barely reaches past a greyish green.


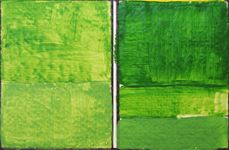
Barrels in Schmincke’s pigments room (left) contain the raw pigment that determines each colour. Pure pigment and pure binders make the strongest paint, but can be expensive. Fillers are used to lower the cost of student paints but drastically limit your tonal range, as the green plus white examples show (student quality: left, artists’ quality: right).
White, the cheapest pigment, is added to many student colours as an extender, so dark mixtures are difficult to achieve. In the image above, where blue & yellow have been mixed to make green, the student colour (left) at full strength is only the same as artists’ colour with white added, because the student quality yellow already contained white. Mixing with artists’ colour achieves a greater tonal range.
The most brilliant, pure colours are made from just a single pigment. These “single pigment colours” mix together cleanly, because, as a rule of thumb, mixing more than four pigments together quickly leads to mud. Most individual student colours are already mixtures of 2 – 4 pigments. To produce extensive paint ranges where up to 70% of their colours are single pigment, Schmincke must use around 250 different pigments!


Even with black & white, the quality is clearly different between the opacity & depth of student and artists’ quality. The binder is just as important as the pigment, as the middle set shows. Artists’ quality acrylics can be extended much further with mediums too, and still have great colour intensity.
Even an inexpensive pigment such as Titanium White costs money. To keep costs down, the pigment concentration of all colours is much lower in a student range than for a professional colour. The black & white example above shows the difference in depth and opacity between the student (left) and artists’ colours, even with these simple colours.
Some pigments have a much higher “tinting strength” than others, i.e. they will more powerfully affect a mixture than other colours. In student paint, the pigment concentration is lowered for these pigments, so that all colours have the same tinting strength. In artists’ quality, just a speck of Phthalo Blue or Green will drastically affect a mix, as these high tinting strength colours are allowed to show their true nature.
Just as important as pigment is the binder. The binder’s job is to provide a vehicle for the pigment that is has good stability, clarity, and adhesion. The type of binder decides the paint type – plant oils for oilpaint, acrylic resins for acrylic colour, and natural resins for watercolour & gouache.
Read out blog 'Oil Colour Mediums Explained' to find out more about how to get the most from your professional oil colours!
Like pigment, the binder can be used concentrated or diluted, to produce a professional (quality dependent) or student-grade (price dependent) paint. With an acrylic, this is simply a case of using a pure acrylic resin or adding water to the concentrate. The consistency of the student grade is then adjusted using a filler.
In the middle image above both qualities have been diluted 1:1 with water. The professional colour (right) maintains a cohesive film on the surface, as well as strong colour and coverage. The student paint, with an already dilute binder, is looking decidedly weak and patchy, where the colour has flocculated and the film unstable. Personally, I always like to add my own water to a concentrate, that way I know what I’m dealing with!
Using a filler in paint causes problems with film clarity. In the example above, both acrylic colours have been extended 1:1 with gel medium – the student colour (left) with a student gel, the artists’ with an artists’ quality gel. The fillers contained in both the student colour & gel have produced a milky and pale result.
Especially in acrylic paints, the stronger the binder, the further a colour can be extended without compromising the clarity and durability of the paint film. Artists’ quality paints will go much further, largely negating the dollar .difference in that factor alone!
To read more about using Golden Acrylic Mediums, read our blog post 'Acrylic Gels and Mediums' >